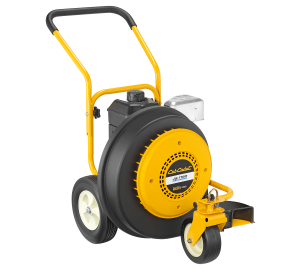
 Setting up a new Cub Cadet JS1150 leaf blower is an exciting time for homeowners who have an interest in home landscaping and outdoor maintenance, but there are several considerations that must be made before putting the equipment into action. Though the leaf blower is mostly assembled upon receipt, there are a few parts that must be separately attached prior to starting the engine. Additional considerations, including everything from fuel and oil to basic information about the leaf blower’s controls, is also important to understand before getting started.
In addition to these concerns, operators should keep safety guidelines in mind. Though they’re often not perceived as a very dangerous piece of equipment, leaf blowers come with powerful engines and discharge rates that can turn lawn debris into dangerous projectiles. Safety procedures, including keeping the equipment away from children, pets, and bystanders, should be followed during assembly, setup, and active use of this essential piece of outdoor equipment.
A Quick Guide to Leaf Blower Assembly and Setup
Though the JS1150 leaf blower is largely assembled out of the box, its handle and chute attachment are shipped separately and installed after delivery. This is simply because the chute attachment and handle would add a bit too much bulk for shipping and delivery to retail stores, authorized dealers, and individual homeowners. Here’s what to know when attaching these key parts.
1. Handle
Get started by removing the screws and star knobs that hold the lower handle in place. Next, put the upper handle into place, sliding it over top of the lower handle until it sits securely on the leaf blower assembly. With the upper handle firmly inserted into place, use the carriage screws and star knobs that were removed earlier to fasten the upper handle and keep it attached permanently to the leaf blower housing.
2. Chute Attachment
The chute attachment is placed onto the equipment by first pulling the blower direction lever all the way forward. Next, slide the chute attachment downward to cover the exposed discharge opening on the side of the leaf blow1er. To finish this assembly process, pivot the direction lever back to a middle position. This will lock the chute attachment into place.
2. Fuel Concerns
Fueling the leaf blower varies based on the specific engine type found within the blower housing, but there are some general guidelines that operators can follow. Generally, Cub Cadet leaf blowers require the use of unleaded gasoline with a low ethanol rating. To ensure that the leaf blower can operate smoothly each time its services are needed, operators should get into the habit of checking fuel levels prior to each use of the equipment. Fuel should generally be topped off prior to each use. For more detailed information on fuel concerns as they relate to the JS1150 leaf blower and its engine, check the included instruction manual for this model’s specific engine model.
3. Adding Oil
The leaf blower does not come with engine oil already added to the engine. Instead, oil must be added by the equipment owner prior to its first use. Engine oil levels and recommendations vary based on the leaf blower model and engine manufacturer, so operators should make sure to check included instruction manuals and guidelines before buying and and using an appropriate engine lubricant.
Cub Cadet Leaf Blower Controls and Features
One of the easiest ways to stay safe during leaf blower use is to become familiar with the blower’s controls and features prior to starting the engine for the first time. The instruction manual includes a diagram of all controls and levers, making it easy to get a general feel for the equipment. Two key controls merit further discussion, however.
1. Caster Wheel Lock
The caster wheel lock feature is an essential part of a wheeled blower, allowing the equipment to travel freely or to travel straight ahead. Located atop the caster wheel itself, this key control requires adjustment prior to starting the engine and utilizing the blower.
2. Blower Direction Lever
The blower direction lever, located just above the discharge chute, has three directional positions: up, down, and straight ahead. Like the caster wheel lock, the blower’s direction lever should be adjusted prior to engine ignition to ensure proper safety and performance.
Find OEM Leaf Blower Parts at CubParts.com
One of the best ways to operate and repair a Cub Cadet JS1150 leaf blower is to use OEM parts throughout the year. OEM parts, manufactured by Cub Cadet in the company’s own factories, stand up to the highest standards of quality and compatibility with each leaf blower model. These parts can be found at CubParts.com using an intuitive search tool, which allows equipment owners to sort available parts by their specific part number, engine type, or associated leaf blower model number. Sorting parts this way makes it easy to keep the JS1150 in like-new condition for many years to come.
