 Mulching turns clippings into fine pieces that can be absorbed into the soil. This helps feed the grass and encourages the growth of microorganisms that can keep thatch build-up in check. Here’s how you can install a mulching kit onto your Cub Cadet riding mower so you can get the benefits of this natural fertilizer.
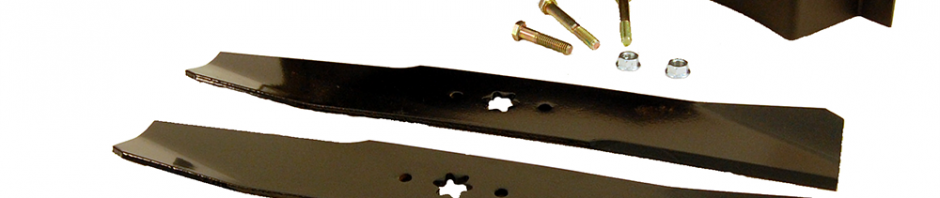
What You’ll Need
Along with a basic set of wrenches, there are a few tools and items you’ll need to complete this job.
Mulch kit: For the best results, the mulch plug needs to be used with a set of high lift blades. Both are included in mulch kits.
Cardboard or another soft surface: The mower deck will need to be flipped over. Placing it on some padding prevents the pulleys from being scratched.
Heavy duty gloves: Mower blades are sharp and can easily cut your hands when handling them.
Wood block or blade removal tool: This keeps the blades from spinning so you can remove the blade bolt.
Breaker bar and socket: Although the maximum torque specification is 90 ft-lbs, the blade bolts can tighten with use.
Torque wrench: Getting the right amount of torque on the blade ensures it will stay on the deck without damaging the threads on the bolt or the spindle.
A set of needle nose pliers may be needed to remove some older decks. Newer QuickAttach decks require no tools for removal or installation.
Step 1: Remove the Deck
Set the deck height adjuster to its lowest position.
Push the deck’s idler pulley inward to relieve tension on the drive belt, then slide the belt off of the engine pulley. If there is a belt keeper surrounding the engine pulley, it needs to be unbolted to allow enough space to slide off the belt.
Disconnect the deck from the three brackets holding it to the mower. QuickAttach decks have J-hooks that can be pulled out, while older models use hairpin clips to secure the deck to the brackets. Some models also have a PTO cable that needs to be disconnected: remove the bow tie clip holding it onto the deck, then disconnect the tension spring on the end of the cable from the deck.
Raise the deck lift handle to the highest position to move the brackets out of the way.
Slide the deck out from under the mower. You can give yourself extra room to remove the deck by turning the steering wheel all the way to the left and sliding the deck from the right side of the mower.
Flip the deck over onto the sheet of cardboard.
Replace the Blades
Position the blade tool or wood block to keep the blades from spinning. Use the breaker bar to unscrew the blade bolts.
The blades should have a part number or the word “bottom” stamped on them. When installing the blades, this side should be facing away from the deck. Torque the blade bolts to 70-90 ft-lbs.
Install the Mulch Plug
Tilt the discharge chute up. The plug has a bolt on the backside. Slide this bolt into the hole on the top of the deck next to the opening. Push the plug into the deck, then attach the strap on the front of the plug to the bracket for the front wheel of the deck. Release the discharge chute. The deck can now be reattached to the mower.
Switching Between Mulching and Side Discharge
The side discharge chute can be left on the mower when mulching, and the high lift blades can be used for both mulching and discharge. To go back to side discharge mowing, simply remove the mulch plug before starting the mower.
Get the Parts and Accessories You Need for Your Riding Mower
Do you need a mulch kit for your riding mower? Are you looking for replacement blades or other parts for your Cub Cadet? Cubparts.com is a certified Cub Cadet dealer, so we stock everything you need to repair your mower as well as accessories that add new functions and improve performance. Our site has factory diagrams and descriptions of parts and assemblies, making it easy to find exactly what you need. We can ship your order to any address in the U.S. or Canada.