
 For those homeowners who are new to the impressive series of Cub Cadet 1X snowblowers, getting started with the equipment can seem a bit intimidating. With a number of safety concerns, numerous controls, and a few operational quirks, the 1X series requires a bit of primer before it’s used to clear snow for the first time. With a few basic tips and considerations in mind, those who are new to Cub Cadet’s powerful lineup of 1X snowblowers will find it quite a bit easier to turn the equipment on for the first time and enjoy the greater degree of convenience when doing away with the aftermath of Mother Nature’s most intimidating winter storms.
Safety Disclaimer: A Warning for Cub Cadet Owners
All snowblowers, including those sold by Cub Cadet in its 1X series, come with powerful engines and many moving parts that can cause serious injury. When getting acquainted with the equipment, it’s important to wear protective eyewear and appropriate gloves at all times. The equipment should only be operated after the snow clearing area has been swept for debris and obstructions, and when all bystanders are indoors. Snowblowers should be started outdoors, on a flat and level surface that guards against tipping or environmental hazards.
Controls and Features: Key Terms to Know Prior to Operation
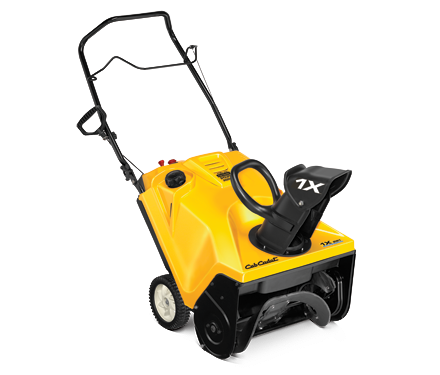
Before getting started with the Cub Cadet 1X series, operators should familiarize themselves with the controls and terminology necessary to safely operate the equipment and handle accumulations of any depth. Before even turning the equipment on, review the controls below and understand their central function in clearing snow and keeping the equipment in excellent operating condition.
1. Chute Tilt Control
The snowblower’s chute control is located just right of the control panel, and is the best way to control where the snow is thrown and how far away it lands. To adjust this key aspect of snow clearing, pull the handle back to increase the snow throwing distance. Push the handle forward to discharge the snow at a lower angle, placing it closer to the snowblower’s current path.
2. Chute Rotation Control
Located in the center of the snowblower control panel, the chute control determines whether snow is thrown to the left or right of the equipment. Push down on the safety button and then adjust the chute accordingly. Adjustments can even be made on an ongoing basis after snow clearing as begun.
3. Auger and Auger Control
The auger is the mechanism within the snowblower that rotates and brings new snow into the equipment for easy clearing and discharge. To start this mechanism, simply squeeze the auger control upward toward the handle. Release the auger control to stop snow clearing in the event of a clog or if the task is finished.
4. Shave Plate
Located near the front of the equipment, the shave plate is designed to keep close contact with the ground during snow clearing. This allows for more precise work, eliminating snow right down to the surface of the pavement.
5. Recoil Starter Handle
The recoil handle is used to start the engine, and requires a small amount of force in order to get the equipment running during particularly cold conditions.
6. Headlight
The headlight, located at the front of the snowblower, is turned on at all times when snow clearing is in process. This piece of equipment is absolutely essential when working after dusk or simply maintaining visibility when snow is being thrown after the storm has passed.
Operation of the Cub Cadet 1X Series
Effective snow clearing means mastering the art of the snowblower’s auger, drive system, and its many chute controls. Before heading out to clean up after any major snowstorm, be sure to consider the information below that concerns each of these key parts.
1. The Auger
The auger is only turned on when the auger control handle is pulled upward toward the handle. When the snowblower has been turned on, using the instructions found in the operator’s manual, pull the auger control to begin removing snow from the surface and discharging it through the appropriate discharge chute. If the snowblower encounters debris, becomes clogged, or needs to be stopped quickly, simply release the auger control lever to stop the spinning motion of the auger itself.
2. The Drive System
To engage the self-propelled drive system, pull up on the drive control handle and begin moving forward. The handle can be pushed downward to stop this motion. To guard against unwanted wear and tear, pull the drive control handle upward slowly. This will reduce wearing of the snowblower’s paddles.
3. Snowblower Chute Controls
Snowblower discharge can be controlled by pulling up and back on the chute control in order to increase the snow-throwing angle. The reverse motion will result in a lower angle and closer snow throwing. Chute controls can also turn the discharge chute left or right based on the position of the chute rotation control on the snowblower’s control panel.
Safety Note: Unclogging the Intake Chute
Occasional clogs, whether the result of snow or other debris, can cause the snowblower to suffer temporary downtime. When clearing such a clog, always do so with a snow clearing bar or a designated stick. Under no circumstance should operators risk their safety by attempting to clear the snow with their own hands.
For OEM Parts and More, CubParts.com Can Help
Customers looking for the best combination of OEM parts and Cub Cadet experience should visit CubParts.com. Thanks to an online parts lookup tool and years of selling Cub Cadet snowblowers, 1X owners will find all they need to maintain safe and easy operation of their equipment.