How to Set Up a 2X Snowblower

Cub Cadet 2X Snowblowers
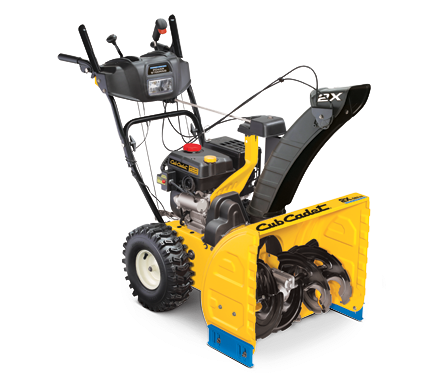
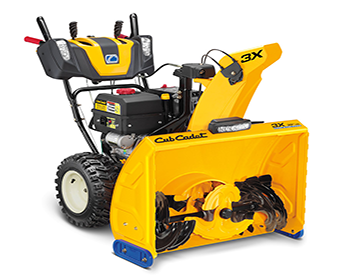
Did you just get a new Cub Cadet 2X snowblower? Whether you got a 24”, 26” HP, 28” HP or the new 30” HP, this guide will take you through everything you need to do to get your new equipment ready to use.

Oil

The engine in this snowblower is shipped without oil in the crankcase. Check the engine manual for instructions on adding oil.

Unfolding the Handle

1. Push the shift lever into “Forward-6.”
2. Look at the back of the snowblower and make sure the cables are seated in the roller guides.
3. Tilt the handle up.
4. Tighten the knobs on the sides of the handle. Your snowblower may have been packed with some rubber bands around parts of the handle. These can now be removed.

Installing the Chute

1. Remove the hairpin clip, wing nut and screw from the chute control head, located behind the chute base. Set the control head aside.
2. Remove the clevis pin and cotter pin from the chute support bracket that was just uncovered by removing the control head.
3. Insert the chute control rod into the head. Line up the hole in the rod with one of the holes in the head, pushing the rod in as far as it will go.
4. Put the chute on top of the chute base. Place the control head back onto the support bracket and insert the screw through the base and head. Don’t tighten it down yet.
5. Squeeze the trigger on the direction joystick and move the chute by hand until it’s facing straight forward. The holes on the control rod should be facing straight up.
6. Rotate the joystick right to the one o’clock position. The pinion gear just below the front of the control panel has a small silver arrow. This arrow should now be facing upward.
7. Slide the control rod into the pinion gear. The hole on the end of the rod should line up with the arrow.
8. Slide the control rod toward the control panel until the hole on the end of the rod lines up with one of the holes in the control head. Insert the hairpin clip into the hole.
9. Reinstall the wing nut, clevis pin and cotter pin to attach the control head to the support bracket.
10. Make sure the cables running through the guide on the top of the engine are sitting to the left side of the control rod.

Spare Shear Pins

A pair of spare pins and cotter pins are included with this snowblower. There’s a space for these on the controls next to the left handle. Insert the shear pins and clip the cotter pins to them to keep them in place.

Chute Clean-Out Tool

This tool attaches to the clip on top of the auger housing.

Tire Pressure

The tires are overinflated for shipping. The correct pressure is printed on the sidewall of the tires. Both tires need to have the same pressure to roll evenly.

Skid Shoe Adjustment

These are shipped in their highest position. If you need to clear an uneven surface, lower the skid shoes to the middle or low position. To adjust the skid shoes, loosen the two nuts on the outside of the shoe, slide the shoe into position, and tighten the nuts.

Auger Control Adjustment

While this is a part of regular maintenance, the auger control needs to be checked before you first use your snowblower.

Checking the tension:

1. Start the engine.
2. Go to the operator’s position and start the auger.
3. Let the auger spin for about 10 seconds, then release the auger. Repeat this several times.
4. Set the throttle to “Fast.” Walk over to the front of the snow blower. If the auger is stopped and shows no sign of movement, the cable is adjusted correctly. If the auger does move, even slightly, go back to the operator’s position and shut the engine off immediately.

Adjusting Tension:

The control cable runs through the roller guide on the left side of the operator’s position. To adjust the control cable, loosen the top screw on the guide and slide the guide up for more slack or down for less slack. Tighten the screw and recheck the cable tension using the method above.

Get the Parts You Need to Keep Your Machine Running

Getting an extra belt and a set of shear pins now can save you from most snowblower mishaps, and if you need something more, we have that, too. As a certified dealer for Cub Cadet and their engine partners, www.cubparts.com is able to offer the full line of OEM parts for Cub Cadet equipment, and we can ship those parts to any address in the U.S. or Canada.

Posted in Uncategorized | Tagged , , | Leave a comment

How to Set Up and Repair a 1X Snowblower

Cub Cadet 1X SnowblowersWinter is coming, and that means snow. Whether you just bought a Cub Cadet 1X snowblower or you’re getting one out of storage, these tips will help you keep your machine performing at its best.

Assembly and Set-Up

1. Open the top of the box, then cut the corners of the front of the cardboard. Fold down this new flap.
2. Pull the snowblower out of the box. Remove any zip ties holding the control cables in place.
3. Add oil to the engine. Check the engine owner’s manual for instructions.
4. Remove the wing knobs and carriage bolts from the handle joints. Rotate the handle upward until the holes on the upper and lower handle line up. Reinstall the knobs and bolts.
5. Slide the chute handle into the slot in the middle of the chute. The tabs on the handle will click into place.
6. Remove the three screws in the chute base. Fit the chute onto the hole, lining up the holes on the chute and the base. Reinstall the screws.
7. Install the eye bolt and handle knob in the hole on the right side of the handle. Leave these parts loose, and line up the opening of the eye bolt with the back of the snowblower.
8. Pull the recoil starter up and pass the rope through the eye bolt. Tighten the eye bolt and knob.

Getting the Blower in Position for Repairs

All repairs to the drive system and auger require tilting the snowblower back for better access. Taking these steps will keep gas from leaking out of the fuel tank and oil from leaking into the combustion chamber while the 1X is in this position:

1. Empty the fuel tank by running the engine until it stalls.
2. Pull the starter handle until resistance is felt. Both the intake and exhaust valves will be closed, reducing the amount of oil that can leak into the cylinder.
3. Tilt the snowblower back until it’s resting on its handles.

Having trouble getting the engine to turn over after the repair? Remove the spark plug and pull the starter a few times. This will flush out any oil inside the cylinder.

Shave Plate

To check the position of the plate, set the snowblower on a level surface. The plate, wheels, and auger should all touch the ground. If the shave plate is brand new, it may lift the auger slightly off of the ground. The plate is too low if it wears out fast or the snowblower doesn’t propel itself. The plate is too high if snow passes under the snowblower.

1. Loosen the four lock nuts on the bottom side of the blade.
2. Slide the blade into the correct position.
3. Tighten the lock nuts, making sure the carriage bolts go into the square holes on the auger.

Control Cable

Over time, the cable and drive belt will stretch from wear, causing the auger to hesitate when the bail is engaged. If this happens, moving the end of the clutch cable from the lower hole to the upper hole on the bail.

Accessing the Engine

The engine is covered by a panel on the back side of the snowblower. This panel is held on by two screws in the panel’s bottom edge and one screw in the top center of the panel. Lift up on the bottom of the panel to disengage it from the tabs on the snowblower.

Replacing the Belt

1. Slide a board through the auger and the chute to keep the auger from turning.
2. Remove the four screws at the bottom edge of the belt cover. Remove the cover.
3. Remove the flange nut on the large auger pulley. Slide the auger pulley off of the shaft and work the belt off of the idler and drive pulleys.
4. Route the new belt around the pulleys. Slide the auger pulley onto the shaft and install the flange nut. If you’re having problems getting everything into position, close the bail to keep the drive pulley from spinning.
5. Reinstall the belt cover and remove the board.

Replacing Auger Paddles

1. Remove the washers and screws holding one of the old paddles onto the auger. Install the new paddle, matching up its position with the paddle on the other auger.
2. Repeat the process, replacing the other paddle and making sure it matches the position of the paddle you just installed.

Need Parts for Your Cub Cadet?

Cubparts.com makes finding parts for your snowblower easy: just select your model and serial number, and our site will show you parts information and diagrams specific to your machine. We’re a certified Cub Cadet dealer, which means we can ship the OEM parts and accessories you need to any address in the U.S. or Canada.

Posted in Uncategorized | Tagged , , | Leave a comment

XT3 Lawn Tractors

Cub Cadet XT3 GSXAre you looking for a mower that can do almost anything? Cub Cadet’s XT3 Enduro Garden Tractors offer serious cutting performance and have the strength to handle trailers and equipment that would be impossible with a ZTR. By adding the right equipment, these mowers can be used all year long, doing everything from overseeding to snow clearing.

Durable and Easy to Use

While it may be small, the XT3 is built like a full-size tractor to handle heavy workloads. The steel frame is e-coated, a process halfway between painting and plating to create a durable, rust-proof finish. Cast iron is used for the transmission housing and front axle, and power is sent to the transmission and PTO using shaft drives, a first for this segment of the market.

This year, Cub Cadet switched from the prosumer Kohler 7000 to its commercial counterpart, the Command Pro V-twin. Both engines share the same block design, but the Command Pro’s improved lubrication and air filtration ensure a longer service life. These engines are paired with a Tuff Torq hydrostatic transmission with a top speed of 6.5 mph going forward and 3.5 mph in reverse. Cruise control is standard, making it easy to get a consistent cut.

Buyers can choose between stamped and fabricated decks in widths ranging from 42 to 60 inches. Stamped decks have maximum vacuum, helping the blades cut an even, smooth finish. Fabricated decks use thick steel plates, making them impact resistant at the expense of cutting performance. The deck can be set to one of 10 cutting positions ranging from 1.5-4 inches. Both deck designs have a built-in washout port, letting you clean the mowing chamber by hooking up a garden hose.

Models

GS: Powered by a 22.5 HP Kohler Command V-Twin, the GS is available with a choice of 42, 50, and 54-inch stamped decks. A front bumper comes standard.

GSX: A 25 HP Kohler Command V-Twin and a locking rear differential give this mower the power and traction needed for demanding accessories. This model is available with 42, 50 and 54-inch stamped decks as well as 48, 50, 54, and 60-inch fabricated decks. Instead of a bumper, this mower comes with a full brush guard.

Accessories

Both the GS and GSX are designed around Cub Cadet’s QuickAttach system, letting you install and remove accessories without tools, whether they’re front or rear-mounted.

Looking to do some gardening with your garden tractor? The disc cultivator breaks ground, while the 42-inch box scraper levels the dirt for gardening or cleaning up paddocks. There’s also a broadcast spreader that takes the work out of seeding lawns.

Need to carry tools and materials? Cub Cadet offers a steel box trailer, composite Hauler trailer with folding sides, and a swivel/dump cart.

For fall cleanup, the company offers 44 and 50 inch-wide lawn sweepers for picking up leaves and pine cones. Leaves and grass can be picked up using double and triple bag clipping collection systems.

For winter cleanup, the XT3 can be used with a three-stage snow thrower attachment. Like Cub Cadet’s 3X snowblowers, this attachment has an auger that chops up snow before sending it through the chute, helping it cut through the densest accumulation.

Cub Cadet offers three options for weather protection: a sunshade, a snow cab and a snow cab that can be converted into a sunshade for year-round use.

Warranty

Kohler guarantees their engines for three years. Cub Cadet covers the chassis and axle for 5 years, fabricated deck shells for the life of the mower, and everything else on the XT3 for four years.

Get Everything You Need for Your Mower Straight From Your Browser

Cubparts.com is a certified Cub Cadet and Kohler Power dealer, providing our customers with everything they need for their equipment. Our site has sections dedicated to common parts like blades and filters, or you can use our search engine to find parts listings and factory diagrams specific to your model. We can ship anything you need to any address in the US or Canada.

Posted in Uncategorized | Tagged , , | Leave a comment

Cub Cadet Volunteer UTVs: Built for Landscapers but Great for Everyone

How Can a Volunteer UTV Help My Landscaping BusinessCub Cadet pitches their Volunteer UTVs as the perfect option for professional landscapers, but they’ve found fans spanning the entire market from weekend warriors to industrial fleets. What makes them so popular? They manage to blend utility, reliability, and fun without any major weak points, and they’re supported with a wide range of accessories, letting them fit a variety of roles from clearing snow to chasing game.

What Do You Get with a Volunteer?

Since these are commercial vehicle first and foremost, Cub Cadet chose a commercial engine: the liquid-cooled Kohler Aegis EFI V-Twin. This engine produces 31 HP and 47.7 lb-ft. of torque, and it has a reputation for rock-solid reliability in high-end commercial mowers. This engine is paired with a CVT that can propel the Volunteer to a top speed of 25 mph.

While at home on smooth, manicured lawns, the designers didn’t skimp on off-road features. The drive system uses push button-selectable four-wheel drive, and the rear axle has a limited slip rear differential and a differential lock for tough climbs. Double A-arm suspension front and back smooths out the bumps, while the coilover shocks are adjustable, letting you get the right rebound for heavy loads or off-roading. Ground clearance is a whopping 11 inches, putting it on par with many sport-oriented UTVs.

Inside the cab, information including speed and fuel are shown on a digital display, while the CVT is controlled by a Hurst shifter. There’s also a 12-volt power port for recharging phones and powering small electronics. Two bucket seats come standard, and a bench seat is available for buyers looking for more seating space.

Available colors include yellow and red. A woodlands camo pattern is also available for a little extra.

Models

Cub Cadet offers three versions of the Volunteer, sharing the same basic platform and powertrain across the line.

Volunteer 4×4 EFI: This may be the cheapest UTV in the lineup, but it’s by no means basic. The 4×4 EFI has a 1,400 lb. total payload and towing capacity, and it can carry up to 1,000 lbs. in its steel bed.

Volunteer WT: Need to haul heavier loads? The WT has 1,700 lbs. of total payload and towing capacity and its aluminum bed can handle up to 1,200 lbs. To handle that extra weight, electric power steering comes standard.

Volunteer WT Cab: This adds an enclosed cab with clear doors for maximum visibility, a windshield that tilts to let in air, and roof-mounted work lights for better visibility.

What Can You Do with a Volunteer?

Cub Cadet offers over 40 accessories to customize these UTVs. Here are some of the most popular add-ons:

Volunteers come with a two inch Class 1 hitch receiver, which is perfect for towing trailers, broadcast spreaders, aerators, and other equipment. A front receiver can also be added, making it easier to maneuver trailers in tight spaces while opening up compatibility for an array of aftermarket equipment.

Need to work late? There are several lighting options as well as a heavy-duty alternator, accessory wiring harness and buss bar kit for adding aftermarket accessories. Want some relief from bad weather? Cub Cadet offers parts to build a solid or soft cab.

A bed liner can be added to protect the metal box from dings and scrapes, while the hood rack adds more space for tools and equipment.

Need to pull your vehicle out of a jam or drag logs and other trail obstructions? The front end can be fitted with a Warn winch rated at 4,000 lbs. This can be paired with a 72-inch dozer blade for moving snow and dirt. Blade height is controlled by lowering or raising the winch.

Working on a large property? By adding a turn signal/brake light kit and a set of mirrors, your Volunteer will meet neighborhood vehicle requirements, making it legal to drive on city streets. A reverse backup alarm is also available to meet safety regulations at industrial and construction work sites.

Get Everything You Need to Outfit and Maintain your UTV

Cubparts.com is an authorized dealer for Cub Cadet and their manufacturing partners including Kohler Power. That means we carry parts and accessories for everything Cub Cadet from push mowers to commercial UTVs. Ordering is easy, too: just select your model and serial number, and our site will show you parts and parts diagrams specific to your vehicle. We ship across the United States and Canada.

Posted in Uncategorized | Tagged , , | Leave a comment

Getting Your Snowblower Ready for Winter

Snowblower Maintenance

Winter is on its way, and that means it’s time to get your Cub Cadet snowblower out of storage Here’s everything you need to do to be sure you’re ready for the first snowstorm.

Tires and Wheels

Now is a good time to lubricate the axles. Remove the wheels, clean the axles and coat them with automotive-grade grease.

The recommended tire pressure is printed on the sidewall. Do not exceed the manufacturer’s recommended pressure: this can rupture of the tire or rim, causing serious injury. If a tire separates from the rim, fit a ratchet strap around the tire tread. Tightening the strap will push the bead against the rim so you can inflate the tire.

Belt (1X Snowblowers)

Remove the cover on the left side of the snowblower and inspect the auger drive belt. Replace the belt if it’s cracked or has stretched to the point that the idler pulley no longer applies tension.

Belts and Gear Box (2X and 3X Snowblowers)

Before adding fuel to the engine, tilt the snowblower back on its handles. Remove the panel on the underside of the blower. Apply anti-seize to the hex-shaped gear shaft and inspect the wheel drive belt. Remove the plastic cover between the engine and the auger housing to inspect the auger drive belt. Replace the belts if they’re cracked or won’t engage.

Cables

When folding the handle back into the operating position, make sure the control cables don’t get caught or pinched. Move the throttle, auger control and drive controls through their full range of motion. If you feel some resistance and the cable isn’t kinked, apply a light oil or silicone spray. Move the control back and forth to spread the lubricant.

Engine

Inspect the air cleaner for signs of rodent damage. If the filter element is torn apart, thoroughly clean the airbox, intake, and carburetor to prevent bits of foam or paper from entering the engine.

Check the spark plug for damage. Poor storage conditions can rust the terminal and plug cap.

If you didn’t change the oil before storing your equipment, you should do so now. Even a small amount of exhaust contamination can turn oil acidic over time.

Snowblower use is unpredictable, so Cub Cadet recommends using fresh fuel mixed with a fuel stabilizer. This ensures the engine will be ready for the next snowstorm, whether it’s next week or next month. The fuel tank and carburetor should have been drained before storage; if they weren’t, do so now and add fresh, treated fuel.

Some manufacturers recommend lubricating the cylinder with oil before storage. It’s normal for the engine to smoke the first time you start it. This is just the oil burning off.

Auger Paddles (1X Snowblowers)

Like the drive belt, these paddles can dry and crack with age. Inspect both paddles for wear and replace as needed.

Shear Pins and Auger Lubrication

All models have shear pins on the left and right side of the main auger, while 3X snowblowers have a third pin at the front of the center auger. Remove these pins and spray lubricant into the shafts, spacers and flange bushings. Inspect the pins and reinstall them. If a pin shows signs of wear or damage, it needs to be replaced.

Shave Plate

Set the snowblower on a flat, level surface. If the shave plate position is correct, the plate and wheels should touch the ground.

Skid Shoes (2X and 3X Snowblowers)

Set the snowblower on a flat, even surface. The tires and the full length of the skid shoes should touch the ground. If one of the shoes is uneven, loosen the nuts on the side of the blower housing, slide the shoe down until it meets with the ground, and tighten the nuts.

Clean Out Tool (2X and 3X Snowblowers)

Make sure this tool is clipped onto the back of the auger housing.

Parts You Should Have on Hand

Both the shear pins and belts are designed to break under stress to prevent damage to more expensive components. You should have an extra set of both parts on hand will help you get your machine up and running if the auger jams. The 3X snowblower even has a place to store spare shear pins next to the controls.

Get Everything You Need for Your Cub Cadet Snowblower without Leaving Your House

From shear pins to complete augers, you can get everything you need for your Cub Cadet snowblower from www.cubparts.com. We’re an authorized dealer for Cub Cadet, so we carry OEM replacements for everything on your equipment and its engine. Not sure what you need? When you select your model and serial number, our site can show you factory parts diagrams and descriptions so you can see exactly what you’re ordering. We ship across the United States and Canada.

Posted in Uncategorized | Tagged , , | Leave a comment

Servicing the LS 27 Log Splitter

Cub Cadet LS 27 CCHP Log Splitter

Even if you’re used to doing your own repairs, it’s easy to be stumped when confronted with a log splitter. Even though the engine may be similar to what you use in other equipment, everything else is unique to these machines. Here’s what you need to know about keeping your Cub Cadet LS 27’s hydraulic pump healthy, addressing noises before they become major problems and storing your splitter so it will be ready for the next wood cutting season.

Tire Pressure

Recommended pressure varies between tire models and is printed on the sidewall. The rim can handle up to 30 PSI. Exceeding this pressure, even momentarily when seating the tire onto the rim, can cause the tire or rim to burst, leading to injuries.

Hydraulic Fluid

Check the fluid level in the reservoir tank before each use. Cub Cadet recommends using these hydraulic fluids in the LS 27:

Shell Tellus S2 M 32
Dexron III / Mercon automatic transmission fluid
Pro-Select AW-32 Hydraulic Oil
10WAW-ISO viscosity grade 32 hydraulic oil

It’s a good idea to use the same fluid to top up the system.

Change the hydraulic fluid and inlet filter after every 100 hours of use. The tank holds three gallons of fluid, and the entire hydraulic system holds 4.7 gallons.

1. Place a drain pan under the reservoir tank.
2. Disconnect the suction hose from the bottom rear of the tank. Let the fluid drain into the pan.
3. Unscrew the inlet filter from the tank opening. Coat the threads in a penetrating oil.
4. Install the new inlet filter and reattach the suction hose.
5. Add hydraulic fluid and check the level using the dipstick. Once full, install the dipstick cap.
6. Disconnect the spark plug and pull the recoil starter 10 times as far as it will travel to prime the pump.
7. Reconnect the spark plug and start the engine. Move the wedge to the furthest extended position and then back to the base of the hydraulic cylinder. Check the fluid level and add more hydraulic fluid as needed. Extend and retract the wedge 12 more times to bleed the air out of the system.

It’s normal for some fluid to come out of the vent hole as it expands from heat.

If you need to service any part of the hydraulic system, flush the tank and hoses with kerosene to remove any contaminants before adding new hydraulic fluid.

Flexible Pump Coupler

This nylon coupler connects the engine shaft to the hydraulic pump. The coupler will degrade with use and age; if it’s vibrating or making noise, it’s due for a replacement.

1. Disconnect the spark plug.
2. Remove the three lock nuts and screws connecting the coupling shield to the pump. Move the pump out of the way.
3. Loosen the set screw on the pump-side coupling half. Remove this coupling half.
4. Gently pull the starter handle on the engine until the set screw on the engine-side coupling half is facing down. Loosen the set screw and slide off the coupling half.
5. Slide the new coupling onto the engine shaft. The end of the shaft should be flush with the coupling half while still leaving space between the coupler and the engine support bracket. Tighten the set screw.
6. Slide the nylon spider onto the coupling half.
7. Slide the pump-side coupling half onto the shaft and rotate it so that the set screw is facing down. Leave the set screw loose for now.
8. Using the starting handle, rotate the engine shaft and spider until they line up with the pump-side coupling half. Slide the coupling half into place and insert the three mounting bolts.
9. Move the pump back into place and bolt it to the coupling.
10. Using a feeler gauge, set a clearance gap of 0.100 to 0.0600 inches between the spider and the engine coupling. Tighten the pump-side coupling set screw.
11. Reconnect the spark plug.

Storage

See your engine operator’s manual for instructions on preparing it for long-term storage. In most cases, you will need to drain the fuel tank, change the oil and lubricate the cylinder.

Clean the log splitter. Do not use a pressure washer or garden hose, as this can push water into bearings and seals, damaging these components.

Wipe down the machine with an oiled rag to create a moisture barrier. Pay particular attention to the wedge and beam.

Store the splitter in a clean, dry area away from flames, sparks and corrosive materials including fertilizer.

Need Parts for Your Cub Cadet?

Cubparts.com is an authorized Cub Cadet dealer, so we’re able to ship OEM parts for log splitters, mowers, snowblowers and anything else from the brand to any address in the U.S. or Canada. Ordering is easy thanks to our advanced search system: just select your model and serial number, and you’ll see factory diagrams and parts descriptions for your specific equipment.

Posted in Uncategorized | Tagged , , | Leave a comment

Tips for Using a LS 27 Log Splitter

Cub Cadet LS 27 CCHP Log Splitter

Is it time to get out your LS 27 log splitter and get some wood split for the fire? These tips will help you protect the hydraulic pump, protect yourself and get the best performance from your machine.

Safety

Wear heavy boots, close-fitting clothing, and safety glasses when operating this machine.

Chock both the front and back of the wheels. The force of the wedge breaking through tough bark is enough to make the splitter jump out of place.

Make sure the beam is locked in position before starting the engine.

Stay in the operator zone when using the splitter. With the beam in the upright position, stand directly behind the splitter. When the beam is in the horizontal position, stand on the right side of the splitter next to the controls.

Setting the Beam Position

Cub Cadet recommends using the splitter with the beam in the vertical position when splitting heavy logs. Using the beam in the horizontal position will let split logs fall into the log tray, requiring less bending to stack them.

The LS 27 has two locks to hold the beam in place. The vertical beam lock is on the left side of the beam next to the engine. The horizontal lock is on the right side of the beam next to the beam support latch.

To engage the vertical lock, pull it out and rotate the handle clockwise 180 degrees. The horizontal lock is spring-loaded and will engage automatically.

Hydraulic Fluid

The fluid level needs to be checked before using the splitter. To get an accurate measurement, start the engine and move the wedge all the way out, then all the way in. The dipstick is on top of the hydraulic tank, between the left wheel and the engine. Check the level and add fluid if needed. Extend and retract the wedge 12 more times to purge any air in the system, and check the fluid level again.

Cub Cadet recommends the following hydraulic fluids:

– Shell Tellus S2 M 32 hydraulic fluid
– Dexron III/Mercon automatic transmission fluid
– Pro-Select AW-32 hydraulic oil
– 10WAW-ISO grade 32 hydraulic oil

Shell Tellus is used at the factory and is recommended when you first top off the hydraulic fluid tank. After that, any of these fluids can be used, but they shouldn’t be mixed.

Setting Up the Log Splitter

Apply clean engine oil to the beam where the wedge will slide. Do not use grease: dust and debris will adhere to the surface, increasing friction and wear.

Before starting the engine, the pump needs to be primed. Disconnect the spark plug, then pull the starter handle as far as it can go 10 times.

Reconnect the spark plug wire and start the engine.

Check the hydraulic fluid level (see above).

Splitting

Logs should have square ends. If one side isn’t even, place the log so that the uneven side faces the wedge. Logs with crotches should be placed with the crotch lined up with the wedge. If the splitter is in the vertical position, turn the log until it leans against the beam. Cutting logs to a consistent length will help them age evenly. The standard log length is 16 inches.

Use your left hand to steady the log while you operate the controls with your right hand. Support the side of the log, never the top. Never use your foot. Keep your hands away from splits: if the wedge is dislodged, the wood can close on your fingers. Instead, retract the cylinder until the wood is pushed off of the wedge.

Towing

The LS 27 is mounted on a trailer designed for a maximum speed of 45 mph. The beam must be locked in the horizontal position before towing.

Get Everything You Need for Your Cub Cadet from One Place

Cubparts.com is an authorized dealer for Cub Cadet and their manufacturing partners so we can provide you with the parts and accessories you need. Our site is built around factory information including parts diagrams and descriptions, making it easy to find exactly what you’re looking for. We can ship orders to any address in the US or Canada.

Posted in Uncategorized | Tagged , , | Leave a comment

Tips for Using Your Cub Cadet Chipper/Shredder Vacuum

Cub Cadet Chipper Shredders

Whether you own a CSV 050 or a CSV 070, a Cub Cadet chipper shredder can take a lot of the work out of fall lawn cleanup. These tips will help you get maximum performance and simplify disposal.

Safety

Wear closed toe shoes and close-fitting clothing. Loose clothing can get caught in the nozzles.

Hearing and eye protection is a must, and it’s also a good idea to wear a dust mask, especially if you have trouble with fall allergens.

Always wear thick gloves when using the chipper chute. Branches can kick back as they’re being fed into the blades.

Before you start cleaning up leave and debris, go through your lawn and remove anything that could damage the vacuum. Small branches can be chopped up in your vacuum’s chipper chute when you come to them, but metal, glass, and plastic can do some major damage to the internal components of your equipment, or worse, be ejected from the outlet at high speed. Never operate your vacuum over gravel. Instead, use a rake to move leaves onto the turf for your vacuum to pick up.

Nozzle Height

The nozzle height is set by moving a pair of levers between the nozzle and front wheels. Both levers need to be in the same position. For the best performance, the end of the nozzle should be just above debris, not in them. This allows air to be drawn in with leaves, maintaining vacuum. If the nozzle is completely covered, the leaves can jam, reducing vacuum pressure while straining the engine.

Bag Care

The bag material has small pores that let air through, leaving leaves and debris behind. Over time, dust can clog these pores, reducing vacuum performance. If this happens, wash the bag and let it dry completely before using it.

Using the Hose

The vacuum hose lets you reach into areas that you can’t drive over with the vacuum, which is handy for picking up leaves next to fences and around bushes. It also concentrates the air being moved by the impeller, increasing suction. This makes it perfect for picking up pine cones.

Pick up the end of the hose and aim it toward the ground before switching the nozzle/hose lever on top of the vacuum nozzle. Like the nozzle, the end of the hose should be kept just above the debris you’re picking up.

If there’s a clog, straighten out the hose so it’s stretched out in front of the vacuum inlet. In most cases, this will be enough to pull the leaves into the impeller housing. For more difficult clogs, shut off the engine and wait until the impeller stops moving. Disconnect the hose and pull the clog out by hand.

Dealing with Collected Leaves

As leaves pass through the impeller, they’re chopped up, making them more compact. This reduces the cost of disposal, but this material can also be used as mulch or compost, letting you skip disposal fees entirely.

Compacted leaves will be much heavier than leaves raked by hand. If you’re collecting leaves for disposal, dump them into heavy-duty lawn bags. Standard trash bags will tear if they’re anywhere close to full.

Using the Chipper Chute

Branches fed into the chute should be straight. Trim off any small branches and feed them in separately.

Hold the branch when feeding it into the chute, but don’t push it in. The chipping blades will cut away the branch and pull it in automatically. If the blades aren’t cutting well, they should be sharpened or replaced.

Get the Parts You Need for Your Chipper/Shredder Vacuum

As a Cub Cadet dealer, www.cubparts.com is able to offer quality OEM parts for anything Cub Cadet from vacuums to professional mowers. Finding parts is simple, too: just select your model and serial number, and our site will show you parts information for your exact equipment. We ship across the USA and Canada.

Posted in Uncategorized | Tagged , , | Leave a comment

Servicing the CSV 050 Vacuum

Servicing the CSV 050 Vacuum

Are you having problems with your Cub Cadet CSV 050 shredder vacuum? Do you need to get it ready for fall lawn care? Here’s what you need to know to keep your lawn vacuum ready to cut up branches and leaves.

Before You Begin

The flails and impeller will still spin for a short time after the engine shuts down. Wait until these components come to a complete stop. Disconnect the spark plug wire to prevent an accidental start.

Lubrication

Apply light oil to these points once per season:

— The wheel shoulder screws on the back wheels
— The pivot arms on the front wheels
— The lock rod that holds the bag
— The nozzle/vacuum lever on the top of the nozzle

Chipper Blade Servicing

Along with common hand tools, you’ll need a 3/16 inch Allen wrench a ratcheting wrench with an extension and a universal joint and a torque wrench.

1. Remove the bag or blower chute
2. Remove the three cap screws holding the chipper chute onto the deck.
3. Remove the front right wheel. Start by unscrewing the lock nut on the end of the axle. Slide off the wheel and the wave washer. Next, remove the shoulder screw on top of the pivot arm assembly. Remove the thrust washer, bell washer, adjustment arm, pivot arm assembly and a second bell washer.
4. Remove the four screws that hold the nozzle cover onto the deck. Three of these are on the back edge of the cover and the fourth is behind and to the right of the hose attachment.
5. Tilt the machine back so that it’s resting on its handle with the front facing up. Support the blower so it can’t tilt forward. Take out the three bolts holding the plastic flail housing onto the bottom of the deck. Tilt the housing toward the engine to remove it from the blower.
6. Remove the flat cap screws attaching the chipper blades to the impeller. The screws can be reached through the hole on the top side of the deck where the chipper chute was bolted on, while the nuts can be reached from the underside of the blower.

Depending on their condition, the blades can be sharpened or replaced. Reassemble in reverse order, tightening the blade screws to 210-250 in-lbs. (17.5-21 ft-lbs.) When fitting the wheel, make sure the outer edges of the bell washers are facing toward from the blower.

Flail Screen

If the leaf discharge is clogged, remove and clean this screen.

1. Remove the bag.
2. Remove the two screws that attach the screen to the blower. One screw is on the right side of the blower deck, and the other is between the bag latch and the chipper chute. Remove the bolt on the underside of the deck. This will free the screen.
3. Remove the screen and clean it by washing it in water or scraping off debris.
4. Reinstall in reverse order.

Troubleshooting

Engine Won’t Start

— Make sure the throttle, engine switch and choke are in the correct positions.
— Check the spark plug wire.
— If the engine has a priming bulb, pump it until there is fuel visible inside the bulb.
— Engage the safety switch. If the engine won’t start with the switch closed, check to see if the switch wires are connected to the engine and to the ground on the mounting bracket.
— Use fresh fuel. Gasoline should be used within one month of purchase or within three months if treated with a stabilizer.

Engine Runs Poorly

— The spark plug wire is loose.
— The choke is still on when the engine is warm.
— The throttle needs to be opened.
— The fuel or air filter is dirty.
— The fuel line is blocked.
— The fuel is dirty or contaminated with water.

Bag Not Filling With Debris

— The bag is too full.
— The discharge chute or flail screen is clogged.
— Something is lodged in the impeller.
— The throttle needs to be opened.

Excessive Vibration

— The impeller may be loose or damaged. Shut off the vacuum immediately and have it inspected by a technician.

Vacuum is Slow or Not Chopping Well

— Make sure the engine is running at full throttle.
— The chipper blades are dull and need to be sharpened or replaced.

Get the Parts You Need Straight From Your Browser

Cubparts.com isn’t just an online retailer: we’re an authorized Cub Cadet dealer. That means you’ll always get quality OEM parts when you order from us. Our site can show you diagrams and parts descriptions from the manufacturer for your model, making it easy to order the right part. We can ship what you need to any address in the US or Canada.

Posted in Uncategorized | Tagged , , | Leave a comment

Servicing the BB230 Blower

TwServicing the BB230 Blower
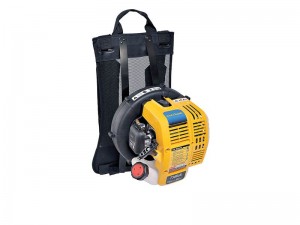
o-stroke engines may be simple, but they still need some care to keep working. Here’s what you need to know to service your Cub Cadet BB230 blower and solve common problems that can keep it from working effectively.

Maintenance Schedule

Every 10 hours: Clean the air filter
Every 25 hours: Check the spark plug

There’s no oil to change on this blower since it’s mixed with the fuel.

Most problems that aren’t caused by the air filter, spark plug or stale fuel can usually be solved by adjusting the idle speed control. The idle speed doesn’t drift at a consistent rate, so it’s not part of the regular maintenance schedule.

Air Filter

The air filter may need to be serviced more often if you’re working in dusty areas.

1. Open the air filter cover, located directly above the fuel tank, by pushing the tabs on its sides and swinging it left or right.
2. Remove the foam filter. Wash it with water and a mild detergent. Rinse the filter thoroughly and let it dry.
3. Soak the filter in new, clean SAE 30 oil. Squeeze the filter to remove excess oil. To make this job less messy, place the oil and filter in a plastic bag and seal the top.
4. Put the filter back on and snap the cover into place.

Spark Plug

Before servicing the spark plug, make sure the engine is completely cool. If you just finished using the blower, this can take 20 minutes or longer.

1. Disconnect the spark plug wire from the plug.
2. Clean the area around the spark plug with a dry brush to prevent dirt and debris from entering the engine.
3. Unscrew the plug using a 5/8 inch plug wrench.
4. Inspect the spark plug. If it’s damaged, fouled or has worn electrodes, it needs to be replaced.
5. Check the spark plug gap. It should be 0.025 inches.
6. Screw the plug into the engine by hand to prevent cross-threading. Once seated, torque the plug to 110-120 in-lbs. (9-10 ft-lbs.)
7. Reconnect the spark plug wire.

Idle Speed

The idle adjustment screw is located on the top of the blower between the air filter cover and engine cover. It can be turned using a #1 Phillips head screwdriver.

To adjust the idle, start the engine and let it run at high idle to warm up. Move the cruise control lever to “Slow.” If the engine stops, turn the idle screw clockwise 1/8 of a turn. Restart the engine and repeat until the engine runs smoothly. If the engine is idling too fast, turn the screw counterclockwise 1/8 of a turn at a time.

Storage

Do the following if you’re storing this blower for longer than a month:

1. Empty the fuel tank.
2. Start the engine and let it run until it stalls. This removes any residual fuel from the fuel line and carburetor.
3. Let the engine cool completely.
4. Remove the spark plug and add 5 drops of two-stroke oil or regular motor oil to the combustion chamber. Pull the starter handle a couple times to distribute this oil inside the cylinder. Reinstall the plug.
5. Clean the blower using a small brush and a cloth. Check for loose bolts and damaged components.

When taking the blower out of storage, remove the spark plug and pour out the oil inside the combustion chamber.

Troubleshooting

Whether the engine won’t start, idle or has problems speeding up or stalling, it’s usually due to one of 6 causes:

— There’s no fuel in the fuel tank.
— There’s no fuel inside the primer bulb. Slowly press the bulb until fuel is visible.
— The fuel is more than 30 days old, or it wasn’t mixed correctly. The engine uses a ratio of 50:1 gasoline to two-stroke oil. If you aren’t using Cub Cadet oil, you should also add a fuel stabilizer at a 150:1 ratio. That works out to 2.6 oz of oil and 0.8 oz of stabilizer per gallon.
— The spark plug is fouled.
— The air filter is dirty.
— The idle speed isn’t set correctly.

Get the Parts You Need for Your Cub Cadet

From leaf blowers to classic tractors, you can get everything you need for your Cub Cadet from www.cubparts.com. We’re not just an online retailer: we’re an authorized Cub Cadet dealer so you can be sure you’ll only get quality OEM parts. Our site even has factory exploded parts diagrams built in, letting you see where the part you’re ordering fits on your blower. We ship across the US and Canada.

Posted in Uncategorized | Tagged , , | Leave a comment